Installation |
This article details, step by step, how to install Packflow.
First of all, be sure to meet the requirements.
This topic contains the following sections:
First you need to start the Packflow setup:
- From the Nexus, click the "Install" button under you Packflow edition.
- From the Windows explorer, start the executable file. It should be named in the format "Packflow.Setup.X.X.X.X.exe". You will be prompted for administrator rights.
Packflow requires a setup folder. It will contain all files used by its components. A location protected from normal users is recommended (like program files).
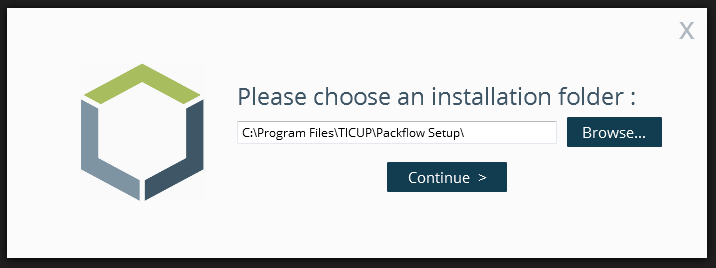
Click "Continue". Packflow will unpack its files before prompting the next screen.
Choose the installation type:

The second and third options will prompt the configuration screen:
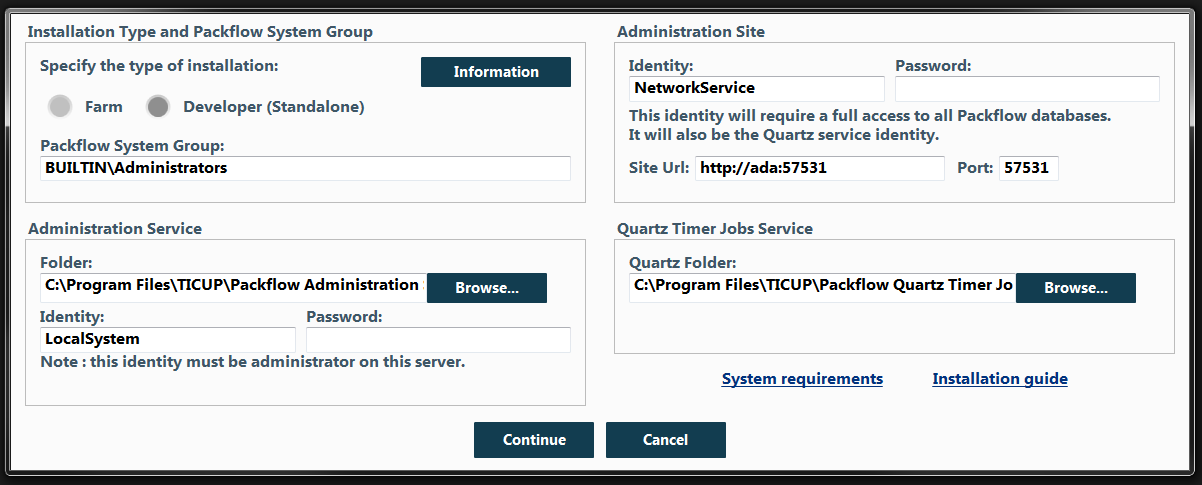
The configuration screen is the most important. First, you have to select the type of installation.
Developer installations will only work on standalone environment (SQL/IIS on the same machine). Click on "Information" for more details. When this mode is selected, all fields will be filled with default values. This allows to go directly to the next step. |
Fill all fields before going to the next step:
- Packflow System Group: Windows or Active directory group used to grant users permissions to administrate Packflow (install applications, etc).
- Administration Site:
Choose an identity for the site (application pool) that will be used to run administrative tasks.
We highly recommend to choose a dedicated user. On production environments, this identity should be different of all other sites' identity.
The port number can be changed to any unused port.
- Administration Service:
This service is used during certain administration tasks when administrator rights are required on the server.
The default LocalSystem account is appropriate for this use.
The folder will contain the executable and assemblies used by the service.
- Quartz Service:
The folder will contain the executable and assemblies used by the service.
System identities (such as LocalSystem or NetworkService) do not require a password. |
Click "Continue" to check your parameters and proceed with the installation.

If a test fails, an error is shown and you have to adjust your parameters on the previous screen (click on "Previous") before checking again.
Finally, the last screen proposes to install Packflow Manager, an essential tool for the next step and to administrate Packflow in general.
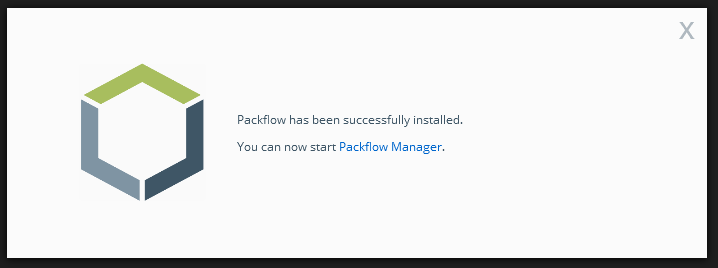
Once Packflow has been installed on the server along with Manager, the next step is to create a site to host your applications.