Forms Authentication |
This aims to give the necessary knowledge to system admins who wish to set up Forms authentication in Packflow.
This topic contains the following sections:
- 1. Overview
- 2. Forms Authentication Setup
- Create a SQL account store
- Configure a Membership Provider in IIS
- Enable Forms Authentication in IIS
- 3. Administration
- Enable Forms Management in Packflow
- Create a Forms account within Packflow
- Password change, Password Reset
- Locking / Unlocking accounts
- Google Authentication
- 4. User Experience
- Login
- Password change
- 5. Important security notes
- 6. Forms Authentication providers and WCF services
Packflow security architecture was designed to rely on existing and well-proven authentication technologies, while being mostly agnostic on the authentication system's specificities. Forms authentications obeys this architectural criterion.
Hence, Forms Authentication in Packflow uses standard ASP.NET Authentication Providers. Attention was given to special use cases in a Forms authentication context.
We made our WebDAV server MS-OFBA compatible, which means you can use Forms Authentication directly in Word, when editing documents online.
Web services were also designed with Forms compatibility in mind.
Packflow can be configured with many Membership Providers, so details below may vary.
We’ll focus on a SQLMembershipProvider created from scratch. Others providers usually require fewer steps.
Create a SQL account store
In many situations, an account store already exists, making this step unnecessary. This sub section is an abstract from this tutorial from Scott Guthrie..
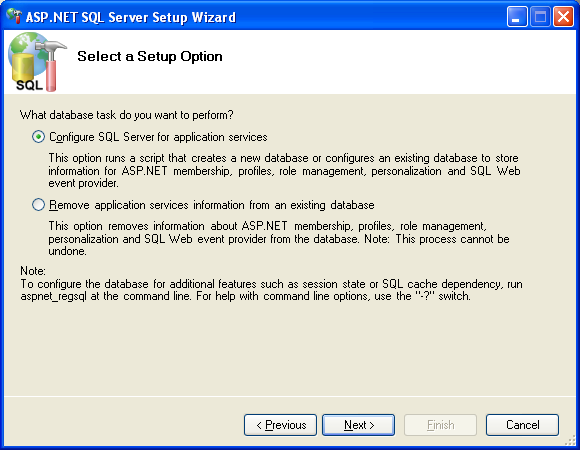
Create the schema
On the Packflow server, in command line, execute "C:\WINDOWS\Microsoft.NET\Framework\V4.0.30319\aspnet_regsql.exe" .
This has to be done under an account with the necessary rights on target database instance.
A wizard dialog will appear.
Select "Configure SQL Server for application services", click "Next"
Choose a SQL server name, then pick the target database in the drop down menu.
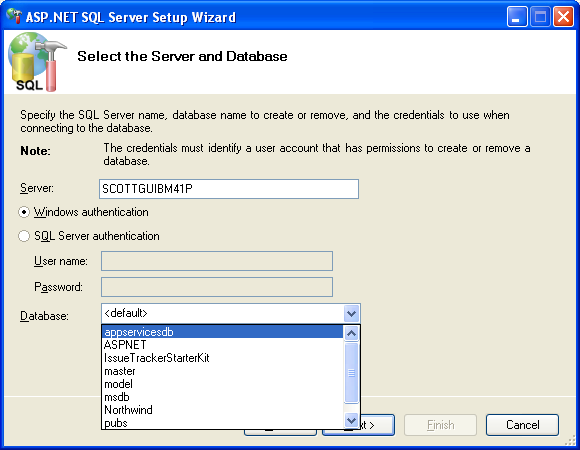
After confirmation, the tool will create the necessary schema in the selected database.
Configure database security
We recommend using Integrated security when connecting to SQL Server. In this case, the app pool’s identity will be used to query the database. You may use hard-coded login/password over sql authentication as well, but we discourage it.
This identity must be a part of specific schema in order to allow validation and management of users.
Open Sql Server Management Studio and connect to the SQL Server instance your db was created in.
Under "/Security/Logins/", check if a login exists for your app pool’s identity. If not, right-click New Login, select WindowsAuthentication, then enter and check identity’s login.
Under “YourDataBase/Security/Users”, check if a user exists for your application pool’s identity. If not, create it by clicking ‘New User’ in the contextual menu.
Right-click ‘Properties’ on “YourDataBase/Security/Users/’YourAppPoolUser”. Add your user to the role ‘aspnet_Membership_FullAccess‘. This is necessary to create and list users.
You may want to restrict the operations allowed on the users database based on a sql role selection, if not managing users from Packflow.
Further details can be found here: Roles and Views in the Application Services Database for SQL Server
Configure a Membership Provider in IIS
We have to edit specific .config files in the virtual directory of the Packflow site.
ConnectionStrings.config
Add a connection string pointing to your account store database. In the example, UpperCase attributes must be changed according to your configuration
XML<add name="PackflowMembership" connectionString="Data Source=SQLSERVER\SQLINSTANCE; Initial Catalog=DATABASE_NAME; Trusted_Connection=yes;" providerName="System.Data.SqlClient" />
Membership.config
Uncomment or add following markup in your membership.config file.
Please note: These settings may be incompatible if accounts in the target database have been created using another configuration.
You are free to use any settings combination in Packflow, but ‘Question and Answer’ and self-registration are not supported by the user interface yet.
XML<membership defaultProvider="PackflowMembershipProvider" userIsOnlineTimeWindow="15"> <providers> <clear /> <add name="PackflowMembershipProvider" type="System.Web.Security.SqlMembershipProvider" connectionStringName="PackflowMembership" applicationName="Packflow" enablePasswordRetrieval="false" enablePasswordReset="true" requiresUniqueEmail="true" passwordFormat="Hashed" />; </providers> </membership>
When creating a fresh database, you need to create a new Forms user before switching authentication mode. See administration chapter for details.
Enable Forms Authentication in IIS
Open IIS manager, select your Packflow site, then double-click the ‘Authentication’ icon.
Disable Windows authentication, Enable Forms and Anonymous authentication
In order to have Forms authentication working within Office clients, you have to change the login page URL to an absolute URL. To change this, select ‘Forms Authentication’, click on ‘Modify’, and change the Login URL to look like this: https://ServerDomain.com/Account/Login. |
Forms accounts may be managed within Packflow through the Asp.Net Membership API. External tools like ASP.NET Web Site Administration Tool can be used too.
Here is a description of typical Forms accounts management operations.
|
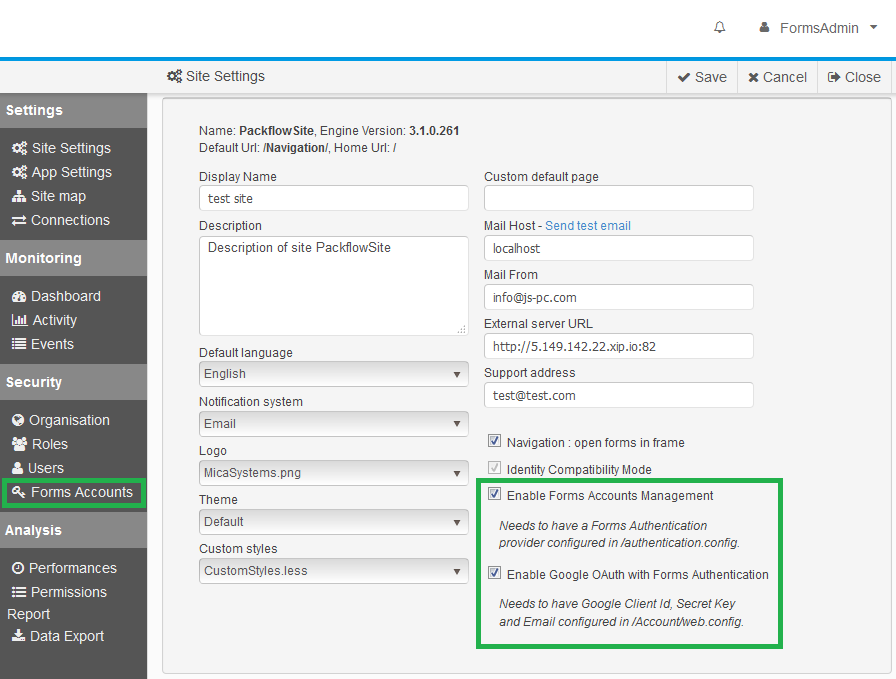
Enable Forms Management in Packflow
Enable this feature to manage Forms accounts within Packflow.
- Navigate to "https://yoursite.local/Administration/Settings"
- Check “Enable Forms Accounts Management”.
- Click save.
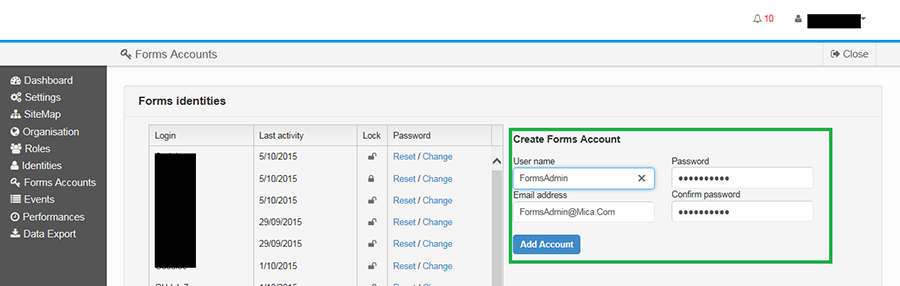
Create a Forms account within Packflow
Click on “Forms Accounts” administration menu item, or navigate to https://yoursite.local/Administration/FormsAccounts.
Enter new credentials in the form, then click 'Add Account'.
The new user will be visible when refreshing the grid view on the left.
Password change, Password Reset
Using the users grid view, an administrator may change a user password (the old password is necessary to do so.)
A password reset may be requested, too. This doesn't require the old password. The new password will appear in a popup and won't be exposed another time, so write it down asap.
Locking / Unlocking accounts
The users grid view displays clickable lock symbol. It allows switching accounts locked/unlocked. Accounts may get locked by administrator or by membership provider security policy. (Too old password, or too many failed login attempts.)
Google Authentication
Packflow can rely on Google OAuth2 API to authenticate Forms accounts. Email address is used as a key to match google profile with an account.
See this page for further details.
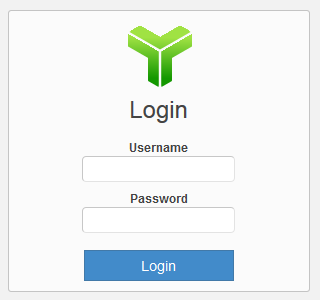
Login
When Forms authentication is enabled, user experience stays the same, excepted the login screen will have a different aspect.
The image displayed is the logo defined in the site settings.
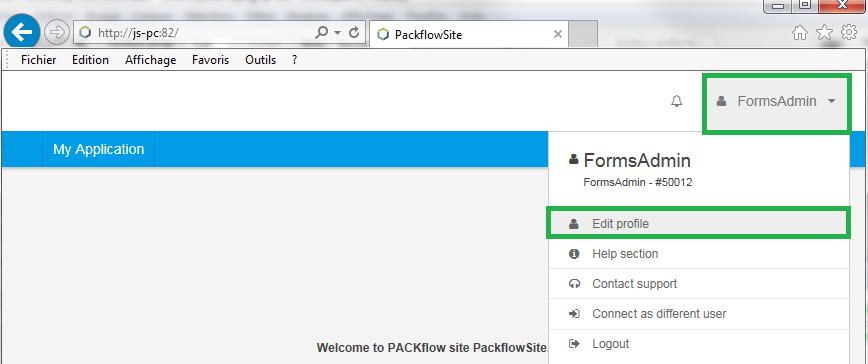
Password change
Users may change their password. Here are the required steps to do so.
In the Packflow toolbar, click 'Edit Profile'.
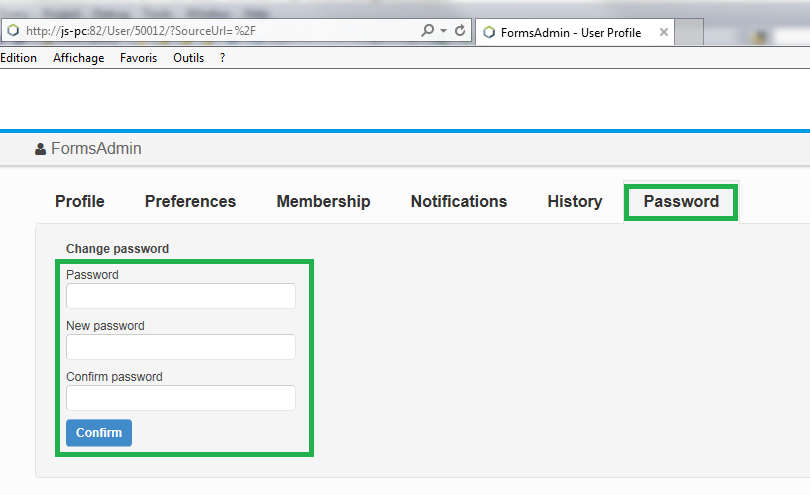
In the user profile page, click the 'Password' tab.
Enter old and new password, then click 'Confirm' button.
Static content is not protected by default.
Forms authentication requires loading and posting pages from the server before authentication has taken place. Hence, Anonymous Authentication is always required when setting up such system, allowing the user to load the ‘Login’ page and static contents like CSS or Javascript before authentication.
We use ASP.NET authorization rules to restrain unauthenticated users to only load ‘Login’ form and WCF services. These rules are not evaluated when pointing at static files, letting them accessible.
 Note
NoteStatic content risk can be mitigated by forcing the ISAPI handler to handle static files, but this creates huge performance overhead.
Please note that files held in Packflow FileHolders and user pictures are not static content and don’t suffer any security degradation when in Forms mode.
SSL/TLS must be used in production.
SSL/TLS with a valid certificate should always be used in this configuration.
TLS ensures transport security and server authentication via certificate validation.
If no SSL is present, the username and password will travel the network unencrypted.
If no signed certificate is present, the user has no guarantee on where he will post his credentials. (MITM attack possible).
NotePackflow won't warn the user if Forms authentication is used over HTTP, since it is a common developer's configuration.
User Accounts Security
Account security is dependent on the chosen MembershipProvider implementation and settings.
Packflow won’t store or validate credentials itself, but will delegate this to the configured MembershipProvider.
This allows you to use any available MembershipProvider implementation, even a bad one.
To be short, it is your responsibility to provide a valid and safe MembershipProvider as an account store.
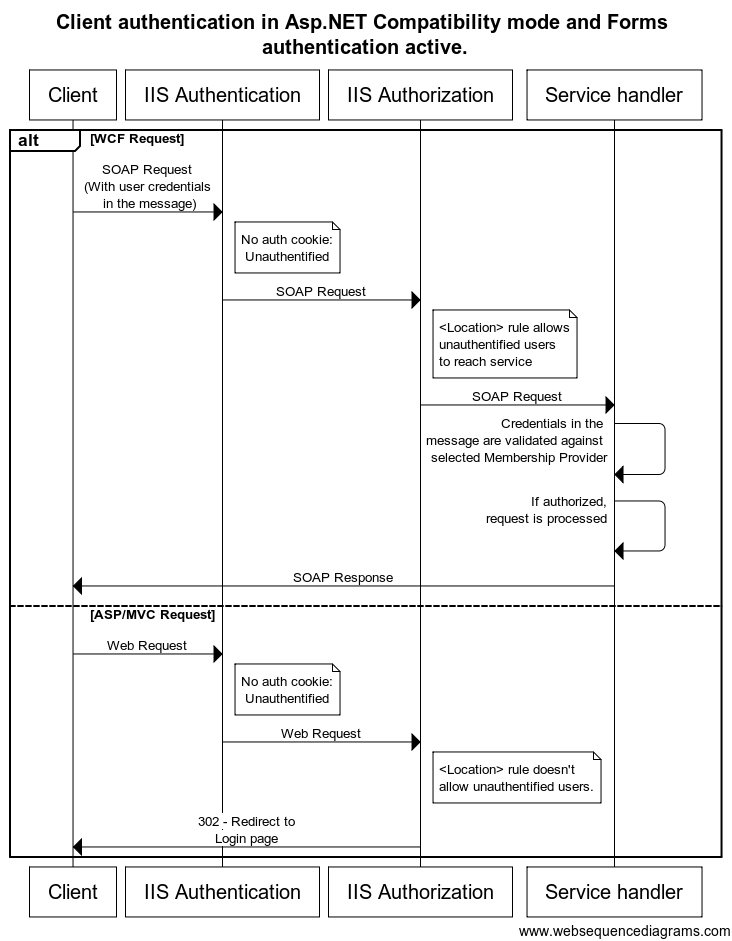
Overview
WCF Services in Packflow work in Asp.NET compatibility mode. This makes them more dependent on the IIS pipeline. The most visible effect is how the asp.net authorization rules affect services as well.
To be authenticated, requests to WCF Service have to bypass the ‘Redirect to Login page’ feature of Forms authentication, and the client has to provide the credentials with every request. The service will validate those credentials against the same membership provider as the site, allowing consistent authentication control.
There is no specific protection of the credentials in the message layer. SSL/TLS is then strongly encouraged in http web services for a production environment.
Configuration Steps
In the authorization.config file, under "<configuration>", add this markup and update the path to your WCF service.
The unauthenticated request won’t be redirected to your login page anymore, so the service will be able to receive and validate unauthenticated requests.
XML<location path="/ApplicationName/Services/MyWCFService.svc"> <system.web> <authorization> <allow users="?"/> </authorization> </system.web> </location>
Add a service behavior relying on the Membership Provider.
In [VirtualDirectory]/Services/Web.Config, under <configuration> < system.serviceModel><behaviors> <serviceBehaviors>, add this markup and choose a membership provider name matching the site’s provider.
You may change the behavior name as well. Setting no name will set this behavior as default.
The membership provider must be properly configured. See Setup section.
XML<behavior name="UserNameProtectedServiceBehavior" > <serviceMetadata httpGetEnabled="true" httpsGetEnabled="true" /> <serviceCredentials> <userNameAuthentication userNamePasswordValidationMode="MembershipProvider" membershipProviderName="PackflowMembershipProvider" /> </serviceCredentials> </behavior>
Configure a service binding.
Binding configurations vary upon chosen binding type. Here are two valid markups for BasicHttpBinding.
The former is for production environments and requires SSL, the latter allows unencrypted transport and is for development only.
These markups have to be located in [VirtualDirectory]/Services/Web.Config, under <configuration><system.serviceModel><bindings><BasicHttpBinding>
XML<binding name="SSLBasicHttpBinding" allowCookies="true"> <security mode="TransportWithMessageCredential" > <message clientCredentialType="UserName"></message> </security> </binding>
XML<binding name="NoSSLBasicHttpBinding" allowCookies="true"> <security mode="None" > <message clientCredentialType="UserName"></message> </security> </binding>
To override default binding and behavior for all services, add a <clear/> tag before the binding and behavior markups, and don't set the 'name' property of those.
Assign new binding and behavior to your service(s).
Under <configuration><system.serviceModel><services>, locate the services you want to protect.
Add or update behaviorConfiguration, bindingConfiguration attributes like in the example below.
This step is unnecessary if the binding and behavior were configured as the default ones (without name). Use [VirtualDirectory]/Services/Web.Config file.
XML<service name="DataService" behaviorConfiguration="UserNameProtectedServiceBehavior"> <endpoint contract="IDataService" binding="basicHttpBinding" bindingConfiguration="SSLBasicHttpBinding" > </endpoint> </service>
Your WCF Service is now protected via Membership Provider.
 Security Note
Service metadata requests (wsdl) remain unprotected. You may update your <serviceMetadata/> tag to restrain access to this functionality.