How To create your first application |
In this tutorial, we will demonstrate how to develop a simple todo list application using the Packflow platform.
Every Packflow application is described by a model. This model defines some of the most common aspects of a typical business application such as roles, permissions and content-types. Conceiving this model is the starting point of any Packflow application development. Packflow Designer is a graphical tool dedicated to the creation of application models. Let's create our first application model.
Creating an application model
Open Packflow Designer.
Click New from the File menu.
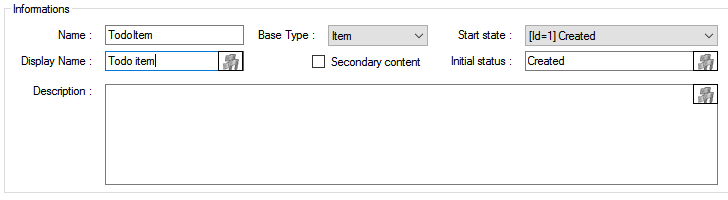
In the Name field, enter "TodoList".
In the Display Name field, enter "Todo list"
The display name is the name that will appear in the user-interface. Many Packflow concepts such as content-types, Views or Columns have a display name. |
Content-types are a way to organize your data. They define a collection of columns, each described by a type and a name. They can be seen as entities (later stored in dedicated database tables) except they offer higher level features such as permissions, workflows or internationalization.
Let’s create the content-type that represents a Todo Item. By default, Packflow Designer creates a blank content-type named Concept. Let’s rename it into TodoItem and give it the display name Todo item.
Columns
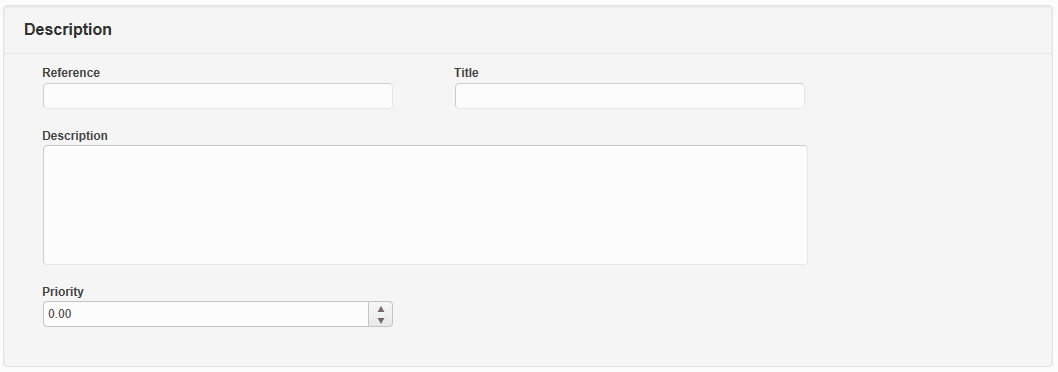
Now, let’s define the columns of a TodoItem. By default, Packflow Designer creates two columns : Title and Description. These columns are not mandatory but we will keep them since a Todo Item precisely needs these two columns. We would also like to be able to sort our todo items by priority so we will add an additional numeric column named Priority.
Add a "Priority" column
From the Columns tab, in the bottom field Create column, enter Priority.
Click Create.
Change the Type attribute of the Priority column to Numeric.

You also edit columns by using the tree view on the left. You will access a comprehensive editor with more advanced settings such as domain contraints or default values. |
States and transitions
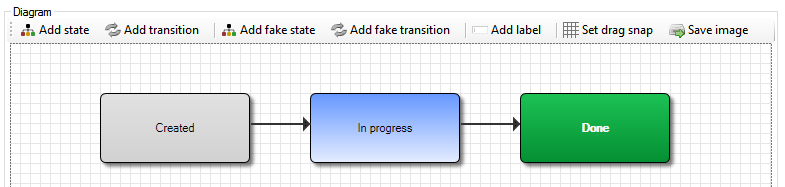
A content-type can define a set of states and transitions. By default, every content-types begins on the state Created. We will add two additional states : In Progress and Done. Packflow Designer offers a graphical diagram designer which allows to quickly define states and the allowed transitions between them.
Add the InProgress and Done states
From the Content-Type tab, in the Diagram section, click Add state
Select the color Blue.
Drag the newly created state to the right side of the Created state.
Right-click on the newly created state and choose Change name.
Give it the internal name InProgress and the display name In progress. Click Ok.
In the diagram designer toolbar, click Add transition.
Drag the newly created state to the right side of the Created state.
Drag each ends of the arrow to the the Created state and the In progress state respectively.
Repeat the same operations to add a state Done as shown in the picture below.
Packflow proposes various levels of workflow complexity. It can be ignored completely, or used to define simple states. But a full workflow can also be designed, with decisional and particpation rules, notifications and tasks. |
Web form
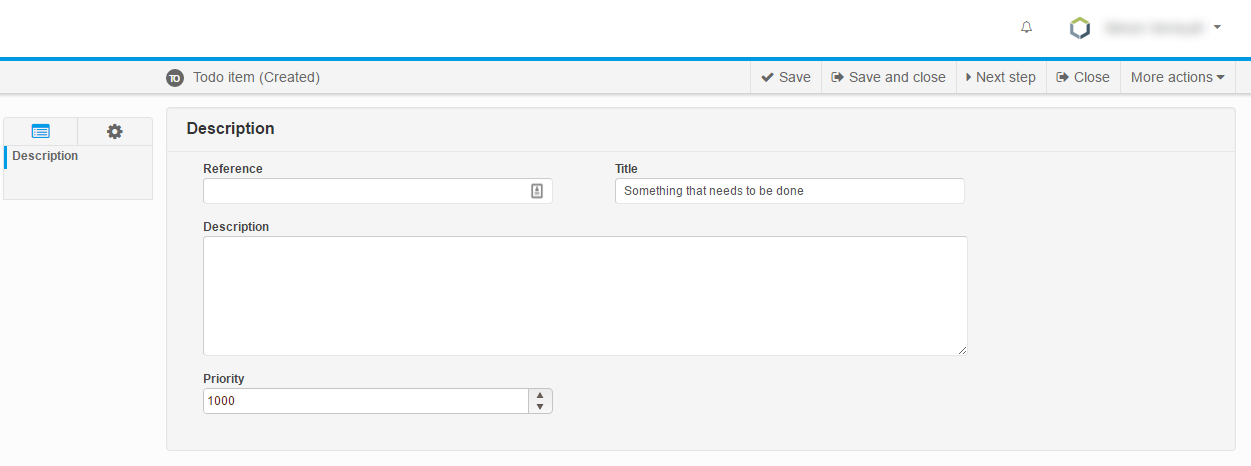
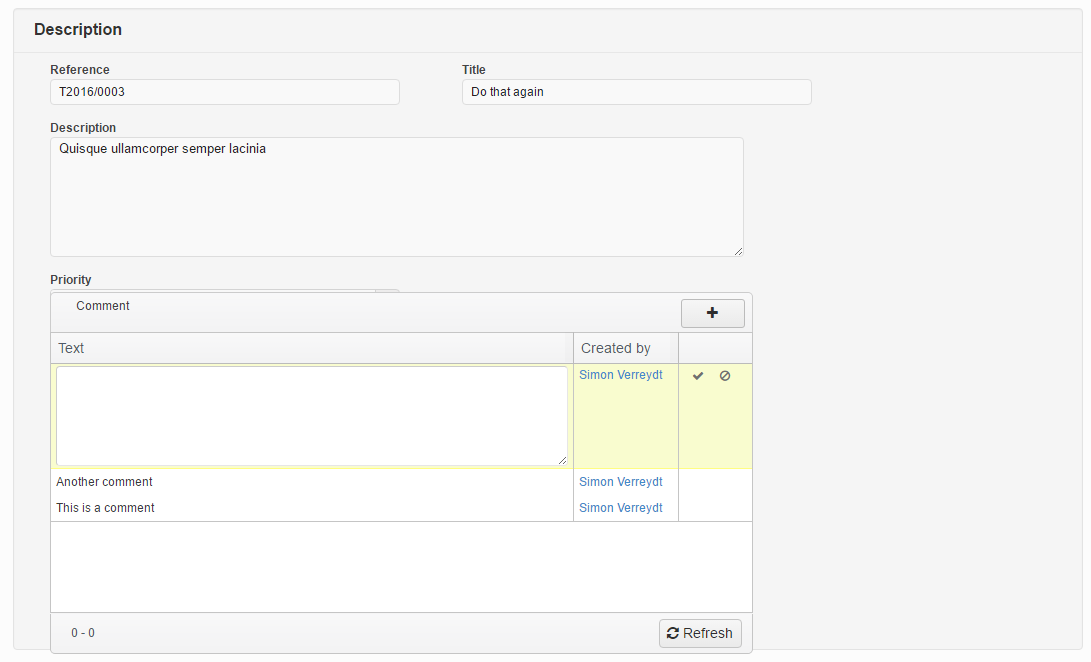
Each content-type contains a form definition. This form allows users to edit individual items of the content-type via the web user interface. The default form for TodoItem already contains a field for Title and Description. Let’s add a new field for the Priority column.
Add a new field for the Priority column
From the left tree view, click on Todo_Form node.
Right click in the form designer and choose Inline from the Add Block menu entry.
Right-click on the newly created block and choose Add Field.
Select Score from the Numeric category and click Ok.
The application is now ready for a first deployment. The deployment process in Packflow consists of two steps. First, you need to generate a Visual Studio project using Packflow Designer. This Visual Studio project will then be compiled and deployed using Packflow Manager.
Generating a Visual Studio project
Click on Generate project.
If it has not been saved yet, a prompt will appear to choose the location of the .pfmodel file (preferably an empty folder).
From the Generate project popup window, click New location and select the folder where the Visual Studio project will be saved (preferably the folder containing your .pfmodel file)
That location will be directly selected for the next generation of this model.
Click on Generate.
Since it’s the first time the Visual Studio project is generated, a dialog window will appear asking you if you want to create a new project. Click Ok.
Packflow Designer will generate a Visual Studio project. Let’s now deploy our TodoList application using Packflow Manager.
Deploying the application using Packflow Manager
Open Packflow Manager.
In the Local Projects section click Add and select the folder where the VisualStudio project was generated.
From the Deployment Options, ensure that Deploy to server '<your_local_server>' is checked and set to Full.
Click Build and deploy.
The previous steps represent the manual procedure to generate, build and deploy an application. In the generation dialog, you can check the "Send to Manager" box. Then, clicking on Generate will execute every step from generation to installation, without any further intervention required. This represents a great gain of time during development cycles. |
Packflow Manager will now deploy the TodoList on your local server. Navigate to the URL configured for your site to see the result.
Packflow creates a default view named AllItems that simply list all TodoItems sorted by creation date. We will add two additional views :
ToBeDone : filters TodoItems that are in the state Created or InProgress and order them by priority.
Completed : filters TodoItems that are in the state Done or InProgress and order them by last modification date.
Creating the "To be done"" view
In Packflow Designer, right-click Views from the TodoItem tree and choose Add View.
Set the name to ToBeDone and the display name to To be done.
From the Visible Columns list, check State, Title, Description and Created by and reorder them to match this order using the arrow buttons on the bottom.
From the Order by list, right click Priority and choose Descending.
Check Default view to make this view the initial view displayed for TodoItem.
From the Filters tree click on the root node and choose Set to Or. Add two filters by clicking Add Filter. Set the column State Id to be equal to Created and In progress in each respective filter.
Creating the "Completed" view
Create a second view named Completed.
Choose the columns Title, Description and Created by from the Visible Columns list.
From the Order by list, right click UpdatedAt and choose Descending.
Add a filter in order to only display TodoItems where State Id is equal to Done.
Deploy the application to see the changes.
Runtime, views can be browsed using the last segment of the breadcrumb in the navigation bar. 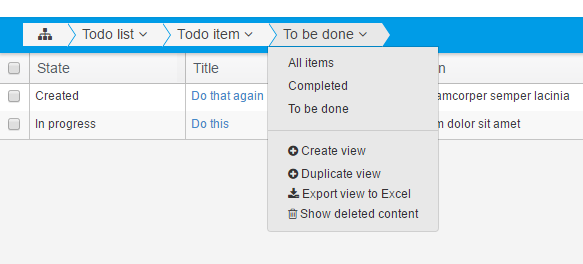 |
Let's add the ability for users to leave comments on Todo items. To do so, we will need a new content-type named Comment. This time we will delete the two default columns Title and Description and replace them by a single column named Text of type Note.
Next, we will need to link TodoItem and Comment using a relation.
Creating a relation between Comment and TodoItem
Right-click on the root node of TodoList application and choose Add Relation.
Give it the name TodoItem_Comment.
Set Type to OneToMany.
Set Content-Type 1 and Content-Type 2 to TodoItem and Comment respectively.
Since a Comment should only have one unique parent, we will choose TodoItem is owner of Comment from the Ownership dropdown list.
Let's now add a comment section in the TodoItem form. Will use a GridView to allow users to display and leave comments.
Adding a GridView
From the left tree view, click on Todo_Form node.
Right click in the form designer and choose Inline from the Add Block menu entry.
Right-click on the newly created block and choose Add GridView.
Give it the name gvComments.
Select the relation TodoItem_Comment.
Since we want to allow users to add new comments we will need to enable creation.
Enabling item creation
From the Creation tab, check Enable creation and select Inline option.
Select every states in the Enabled in these activities/status list.
Click Ok on the bottom of the dialog.
Finally we will define how comments should be displayed by configuring the previously created view.
Configuring the view used by the GridView
Access the view editor by right-clicking on the GridView and choosing Modify view.
Select Text and CreatedBy in the Visible columns list.
Select the column Created at in the Order by list and choose Descending order.
This tutorial only scratches the surface of what can be achieved using the Packflow Platform.
We invite you to read the following articles to learn about more advanced application customization :